Why Everyone (Especially Non-Runners) Should Do the Runner’s Lunge

The runner’s lunge is a staple stretch for runners and sun-saluting yogis, but the move may actually be most beneficial to those who spend more time on the couch than the track or yoga mat.
Among a host of other issues, excessive sitting causes tightness in the lower body. The runner’s lunge, when done properly, can help combat that.
But, in order to achieve real results (and relief), you must perform the runner’s lunge properly.
Runner’s Lunge: Step-by-Step Instructions
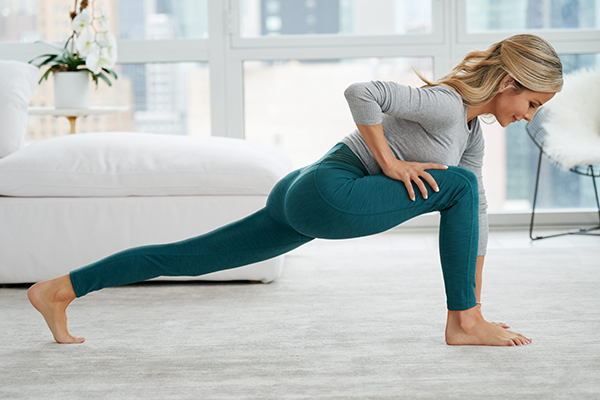
- Stand with your feet about hip-width apart. With knees slightly bent, bend forward at your waist and place your palms next to the outer edges of your feet.
- Bend your right knee and extend your left foot behind you, placing the ball of your left foot on the ground. For added stability, gently lower your left knee to the ground. You can place a towel or mat under your knee for comfort if needed.
- According to your level of flexibility and comfort, lower your hips, allowing your body to sink into the stretch. You should feel the stretch in your hip flexors, quadriceps, and calves.
- Hold the runner’s lunge for up to 30 seconds before switching legs.
Runner’s Lunge Benefits and Muscles Worked
The runner’s lunge stretches your calves and quadriceps, but you’ll feel the biggest release in your hip flexors, the muscles that help you draw your knees toward your chest.
If you spend most of your waking hours with your hips flexed (e.g., commuting by car or sitting at a desk), you probably have tight hip flexors and can benefit from the runner’s lunge.
“Tight hip flexors can be a result of poor posture, muscle imbalance, or sitting too much,” says Melissa Morris, MS, ACSM-certified exercise physiologist. “Tight hip flexors can cause poor running form and a host of lower-body issues, like low back pain, knee pain, or ankle and foot issues. The runner’s lunge stretches the hip flexors and prevents them from being overly tight.”
Tips for the Runner’s Lunge
1. Warm up first
Morris recommends doing the runner’s lunge only after you’ve warmed up or worked out.
“You never want to do static stretching (where you hold a stretch) when your muscles have not been warmed up prior to the stretch. There is no benefit, and it may even affect performance,” she explains.
2. Focus on form
Proper form is also crucial when performing the runner’s lunge, for both efficacy and injury prevention. To protect the knee of the front leg of the runner’s lunge, make sure that it does not extend beyond the toes.
3. Relax your hips
Be careful about holding tension in your hips while doing the runner’s lunge, says Caleb Backe, CPT.
“Many people make the mistake of holding their hips tight in order to maintain balance,” he says. “Let your hips sink to experience the stretch as deep as possible.” If you struggle to maintain balance, lower your back knee to the floor.
4. It’s not a contest
When it comes to holding the runner’s lunge stretch, longer isn’t always better.
“You may perform the runner’s lunge during a yoga class for a prolonged period of time, but the key is to maintain the correct posture and modifications for at least 30 seconds,” says Marqui Rennalls, DPT, pelvic floor physical therapy specialist. “Holding it for longer is only beneficial if you can maintain the correct posture throughout that time.”