The Benefits of Foam Rolling — Plus 8 Exercises
Also referred to as self-myofascial release, foam rolling is essentially a form of self-massage that allows you to apply deep pressure to certain points of the body to release tightness and muscular tension.
Adding foam roller exercises into your workout routine can help prevent muscle soreness, tightness, and more.
The Benefits of Foam Rolling
The idea behind foam rolling exercises is that by applying direct and sweeping high mechanical loads to muscles and tissues, you stretch and massage the underlying tissues.
This is believed to reduce thickening, adhesion, and tension of the fascia [connective tissue] and muscle, and can potentially reduce fatigue, improve recovery, and enhance range of motion.
“Foam rolling can help promote blood flow and break down scar tissue. It could also help maintain normal muscle length, reduce pain and soreness, increase range of motion, and aid in recovery. Foam rolling is a great way to help relax your muscles,” according to Peter Dipple, head of sports and massage at the London-based Ten Health & Fitness.
“Even those who are inactive could see benefits, as foam rolling exercises can help relax muscles that may have become tight from sitting at a desk all day,” he adds.
How Often Should You Use a Foam Roller?
“The more you foam roll, the more your muscles respond to it,” says Dipple. “Ideally, you should do it daily — as you would stretching — although ease yourself into it by gradually building up the number of sessions you do.”
He recommends dedicating 10 to 20 minutes per session to foam rolling exercises at least once a day to simply get out the kinks.
“When you find an area of tension, work around it for about 30 seconds using short, slow rolls and follow this up with longer, slower (and more soothing) strokes over the whole length of the muscle,” he adds.
As for the hurting thing? Well, it might feel uncomfortable, especially when you first start doing foam rolling exercises.
“When you’re working an area of tension, you’re applying your body weight to a tender area so you may well feel some discomfort,” says Dipple. “But if the pain is excruciating, stop immediately.”
He also advises seeking advice from a professional before foam rolling if you’re suffering from a serious injury or chronic condition like diabetes.
8 Simple Foam Roller Exercises
Relieve sore muscles and improve your recovery time with these eight foam roller exercises.
Keep reading to learn about four common foam rolling mistakes you should avoid, and our recommendations on the best foam rollers out on the market.
1. Calves
- Sit on the floor with your legs straight, ankles crossed left over right, and a foam roller under your right ankle.
- Place your hands on either side of your butt and lift it off the floor, rolling your right calf muscle over the roller — from ankle to knee — a few times with your toes pointed up.
- Repeat with your leg rotated inward (so you’re rolling the inside portion of your calf), and then again with your leg rotated outward.
- Switch legs and repeat.
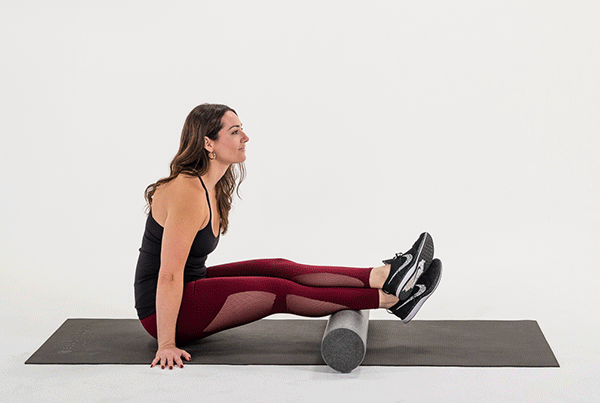
2. Hamstrings
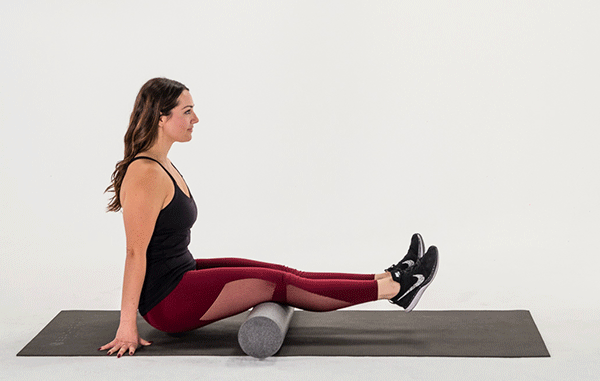
- Sit on the floor with your legs straight and a foam roller under your thighs. Place your hands on the floor on either side of your butt.
- Lift your butt and use your hands to roll the entire length of your hamstrings — from just below your butt to your knees.
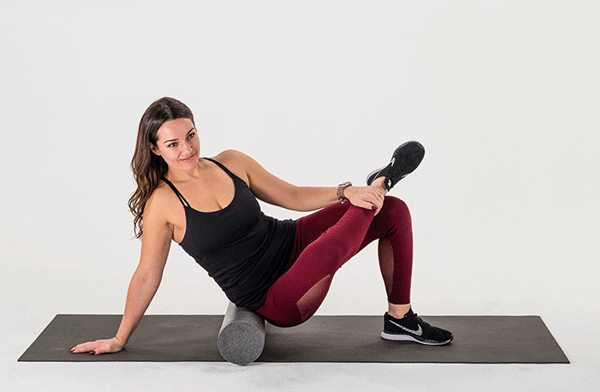
3. Iliotibial (IT) Bands
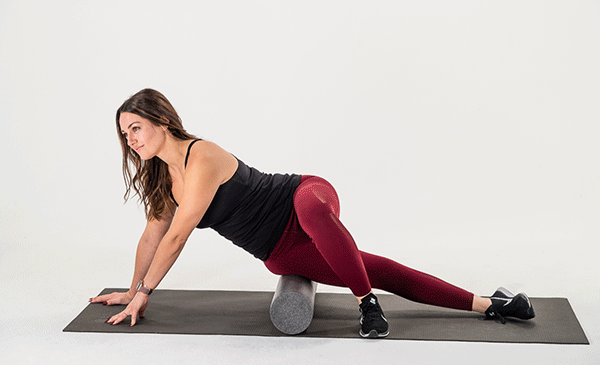
- Lie on your right side with your legs straight and a foam roller under your right hip.
- Placing your hands on the floor for support, cross your left leg over your right, placing your left foot flat on the floor by your right knee.
- Use your hands to roll the side of your upper leg over the roller several times.
- Switch legs and repeat.
4. Quads
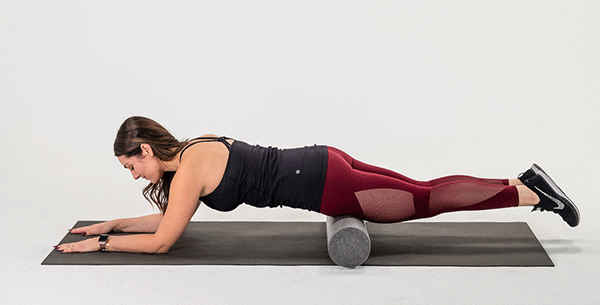
- Lie face down on the floor with your legs straight and a foam roller under your quads. Prop yourself up on your forearms.
- Slowly roll your quad muscles from the tops of your legs to the tops of your knees.
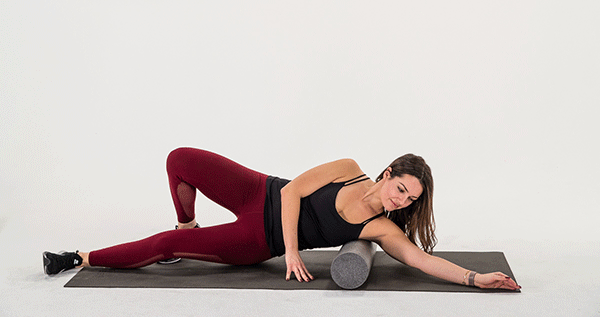
5. Gluteal muscles
- Sit on a foam roller with your left foot flat on the floor and your right leg crossed over your left thigh. Place either both of your hands or only your right hand on the floor behind you for support.
- Tilt your body to your right so that your right glute presses against the roller.
- Roll forward and backward several times, and then repeat on your left side.
6. Inner Thigh

- Lie on your stomach, propping yourself up with your forearms, and bring your right knee up to your side at a 90-degree angle.
- Place a foam roller under your right thigh parallel with your body.
- Slowly roll from your groin to the inside of your knee several times.
- Switch legs and repeat.
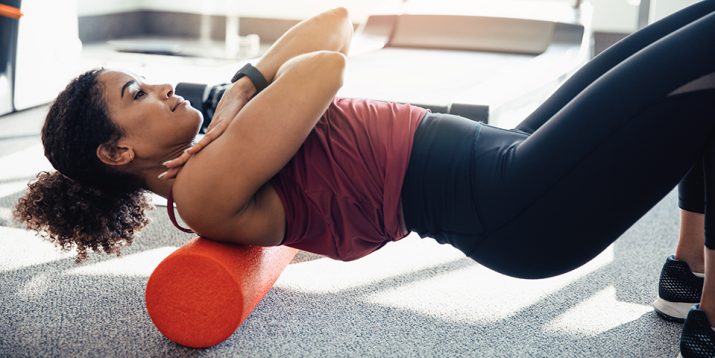
7. Back
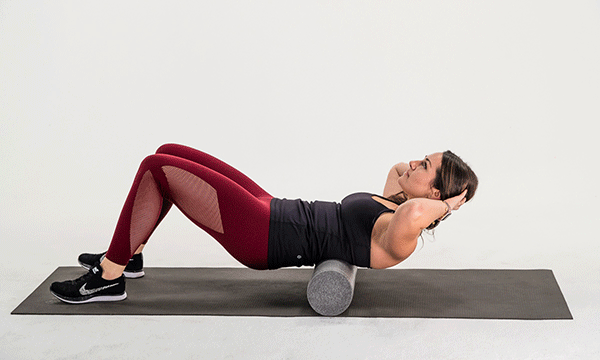
- Lie face up with your knees bent, feet flat on the floor, butt lifted off the floor, and a foam roller under your mid-back.
- Place your fingertips gently behind your ears or cross your arms in front of your chest, and slowly roll the entire length of your back from your shoulders on downward.
- Alternatively, you can focus on different areas of your back, rolling just your upper back several times before moving on to your mid-back and then finally your lower back.
8. Lats
- Lie on your left side with your legs straight, your left arm extended above your head, and a foam roller under your armpit.
- Place your right hand on the floor in front of you for support, and place your right foot on the floor behind your left leg.
- Use your right hand and foot to slowly roll your left side from your armpit to below your ribcage several times.
- Switch sides and repeat.
4 Foam Roller Mistakes to Avoid
1. Avoid rolling directly onto your lower vertebrae
Dipple says, “Your lower back muscles will contract to help protect the spine which can cause discomfort or injury.”
2. Do not hold your breath, though it’s tempting when discomfort hits
Instead, says Dipple, take long deep breaths as you roll to increase blood flow to the working muscles and derive more of the benefits of foam rolling exercises.
3. Stop rolling evenly on each side
“If it’s your right leg that has an issue, spend more time on that side,” says Dipple. “Don’t neglect your other leg, but don’t worry about doing exactly the same on both sides.”
Focus on the muscles and joints that need more TLC, even if they are mostly on one side of your body.
4. Avoid rolling too quickly!
Longer, slower, more measured rolls, while taking deep breaths, will cause your brain to send a message to your muscles to relax.
Try One of Our Favorite Foam Rollers
BODi Foam Roller: This foam roller comes in two sizes — 18″ or 31″ — and has plenty of room to play with, so it’s great for working more than one body part at a time.
Travel Size Foam Roller: At just 12″ x 3″ x 3″, this mini roller targets smaller areas like the foot, forearm, shin, or calf. And since it’s mini, it can easily fit into your purse or gym bag.
GRID Foam Roller: The 3D surface has a number of bands of varying widths designed to replicate the feel of a massage therapist’s hands. Comes in fun colors, too.