This One Thing Can Help You Be More Successful in The Kitchen
Ever walk into a busy restaurant, get seated at the last available table, and watch as swarms of harried servers stream out of the kitchen, arms loaded with finished dishes that they rapidly distribute to eager guests?
In the hour or so you were there, how many plates came out that door? 100? Maybe more?
Now guess how many cooks are in that kitchen. The answer might surprise you. It’s usually only three or four.
On a busy night, your average line cook is turning out 25 to 35 finished dishes per hour. That’s a lot of food for one person, and if you’re at a high-end restaurant, every one of those plates is camera-ready.
So how do they do it?
Yes, they’re highly trained and working in a professional kitchen, and that certainly helps. But probably the biggest factor in their speed and efficiency, and one of the first lessons those cooks learned when they received their training, was the importance of mise en place.
Like most formal culinary terminology, mise en place is of course a French phrase, which roughly translates to, everything in its place.
A simple idea, really, but one with profound implications.
Not only is it the key to speed and efficiency in the kitchen, it can turn your cooking experience from a sweaty, stressed-out nightmare, to a calm, enjoyable, even meditative experience.
When you start with a well-organized workspace, recipes just seem to come together naturally.
When I was a chef in New York City, I used to use the phrase “set up for success” so often that my cooks would parrot it back to me. I didn’t mind. The teasing let me know that I had drilled it into their heads, and that was my intent all along.
They might get annoyed when I come stomping down the line and move a spoon six inches to the left and say, “Now you won’t have to move your feet when you reach for it.”
But, they quickly learn what a difference these small tweaks make, and then they become just as mise en place obsessive as I am. Why? Because it makes their lives easier.
Of course, while watching FIXATE on BODi in our kitchens at home, we don’t have to be quite as obsessed.
We’re not cooking for hundreds of people, and there’s no food critic lurking in the dining room.
But even in your own kitchen, a little bit of mise en place know-how goes a long way.
It can help you move through a recipe faster and cleaner, with more consistent and higher quality results, and without setting your hair on fire, literally or figuratively.
How to Apply Mise en Place to a Recipe
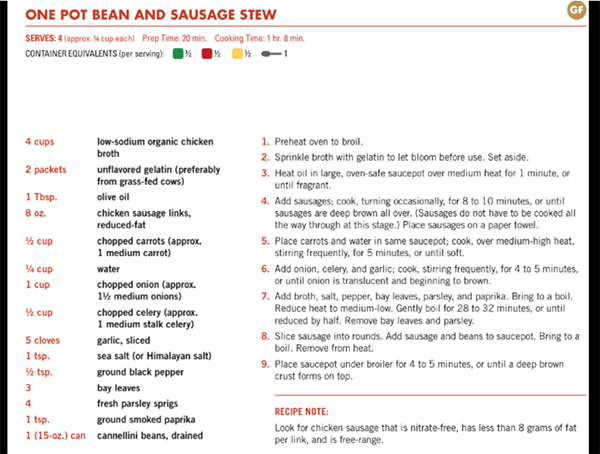
As an example of how to apply mise en place to your home kitchen, let’s take a look at a typical FIXATE cook book recipe and break it down.
Steps:
1. Have all ingredients on the counter.
2. Clean as you go.
3. Put ramekins of different sizes on the counter.
What is important about these ramekins are that they are functional — they don’t need to be pretty or expensive.
Plastic, glass, or ceramic — the material doesn’t matter; they just have to be cost-effective and dishwasher safe.
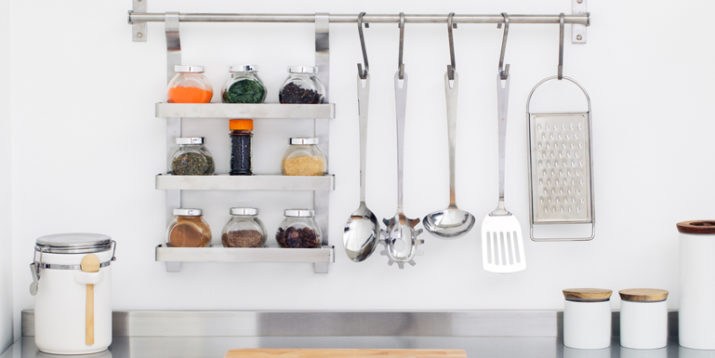
Here’s an example of some I keep in my cabinet.

They don’t match, but they get the job done. This is all about efficiency, so I don’t need a separate container for each and every ingredient.
4. Have two sets of measuring spoons and two sets of measuring cups easily accessible.
One set is for wet and the other for dry. It’s not totally necessary, but once you get a spoon wet, no matter how well you dry it, it always seems to stick to dry ingredients like salt and flour, so having dedicated sets can save on headaches later.
5. Do the knife work first.
Cut all of the vegetables on a cutting board. For this recipe, I need carrots, onion, celery, garlic, and parsley.
I can grab those all in one trip to the fridge, and keep them on the counter next to my cutting board as I work.
6. Fill the ramekins.
I scan the instructions for carrots and see that they’ll be added in step 5, along with ¼ cup water. So I chop my ½ cup carrots and place them into a medium ramekin, then measure the water into the same container.
Next up is the onion. I scan the instructions, and step 6 tells me that the onion will be added along with the celery and garlic, so let’s take care of those together.
I chop 1 cup of onions and put them in a large ramekin along with ½ cup chopped celery and 5 sliced garlic cloves.
That leaves only parsley, which I can see from step 7 will be added along with the dry spices and broth. So, I chop my parsley, put it in a bowl large enough to hold 4 cups of broth, and set it aside.
So now that I’m done with my veggies, I’m going to put the leftovers back in the fridge and grab the broth I need to go into my parsley bowl.
7. Measure the broth and add the spices.
Once my broth is measured out, this bowl needs the remaining dry spices, so I grab my dry measuring spoons and make one trip to the spice rack for salt, pepper bay leaves, and paprika.
This is also where I happen to keep my gelatin, which needs to bloom in the broth, so I can knock that all out in one step.
8. Put a paper towel on a plate.
Now my only ingredients left are sausage links, olive oil, and a can of beans.
The beans need to be rinsed, so I do that first, and I see that the sausage links will be sautéed whole in the olive oil, so the only mise en place I need for that is a plate with a paper towel to lay them on afterward.
So now I’m set to go: one bowl with broth, gelatin, spices, and chopped parsley; one ramekin with carrots and water; one ramekin with onion, celery, and garlic; and a bowl of rinsed beans for a total of two bowls and two ramekins.
Everything is pre-measured and chopped. I’ve minimized my trips to the refrigerator and spice rack, and now I can prep without skipping a beat, knocking out each step in succession without worrying about measurements or whether or not I’m burning my onions.
I chopped all my veggies in one step then returned the leftovers to the fridge, and I measured all my spices in one step at the spice rack, putting each one back when I was finished, so now my counters are clear and I have room to work.
Also, my clean-up consists of putting my four mise en place containers in the dishwasher, along with the plate I rested the sautéed sausage on and the spatula I used to stir the stew. Not bad.
Preparation Is Key
It’s always tempting to jump right into a recipe and just get it done, grabbing what you need as you go and only thinking about the step that’s in front of you.
And while this may feel efficient, in reality, you’re creating more steps, more trips to the fridge, pantry, and spice rack making more of a mess in your kitchen and increasing your stress levels.
Taking the time to look over a recipe first, familiarize yourself with the steps, pre-cut and measure your ingredients, and group them together according to their placement in the process not only saves you time, but it also allows you to focus on what you’re doing, instead of being pulled in multiple directions at once.
When you’re cutting vegetables, all you’re doing is cutting vegetables, so you can keep your eye on the task and not end up cutting yourself.
When you’re sautéing, all your ingredients are laid out and ready, so your focus is on the pan, and you’re not going to burn your hard work.
Not only will this reduce stress, but it increases your chances of success, and after all, there’s no greater waste of time than a failed dish.
So, whether you call it mise en place, set up for success, or simply being organized, preparation is the key to a successful, relaxed, and enjoyable cooking experience.
And just like with your workouts, this is a moment for you to take care of yourself. Don’t dread it, rush through or cut corners.
Preparing a beautiful, healthy meal from all-natural ingredients is an indulgent experience.
Relax into it, take your time, stay organized, and have fun, and you’ll know why Irma Rombauer, that Midwestern homemaker to whom so many professional chefs owe a debt of gratitude, called it the “Joy of Cooking.”