How to Do Extended Side Angle Pose in Yoga
If you’ve been seeking a great side stretch, look no further than the extended side angle pose in yoga, also known as utthita parsvakonasana in Sanskrit. Not only does it stretch the side of your torso, but it also stretches the side of your legs, and it even gives you a deep stretch in your groin.
How does this all work? Utthita parsvakonasana creates a long side angle all the way from your back heel to the tips of your fingers as you bend deeply in your front leg. It’s a preparatory pose for many wide legged-poses, as it’s great for opening the hips, and is found most often in the warrior vinyasa flow sequences.
Here’s how to get into it and perform it with proper form.
Extended Side Angle Pose (Utthita Parsvakonasana): Step-by-Step Instructions
Set up
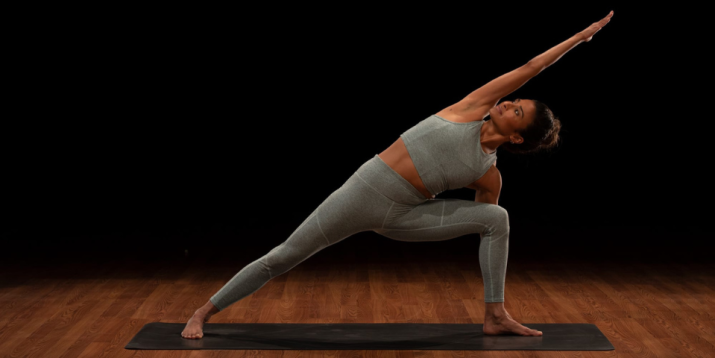
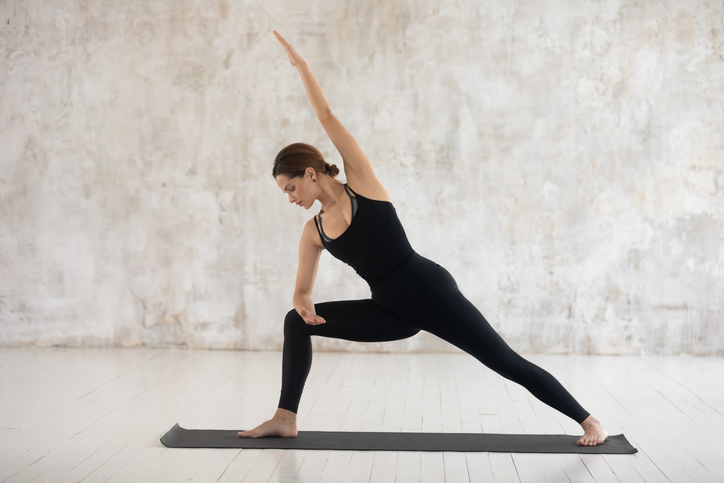
- Start in mountain pose. On an exhale, step your left foot back three to four feet into Warrior 2 pose, with your foot turned 90 degrees so that your left arch is in line with your right heel.
- Bend your right knee to a 90-degree angle directly over the ankle, with the toes of your right foot pointing forward. Reach your right arm forward and your left arm back to create a “T” shape with your palms facing down. Press your left foot firmly into the ground, and square your chest and hips to the left side.
Getting into the pose
- On an inhale, engage your core and reach forward with your front arm to lengthen your waist. Place your right hand to the outside of your ankle, on a yoga block, on the floor, or bring your right forearm to your thigh.
- Then, exhale and reach your left arm up and forward, bringing your biceps by your left ear to stretch your side even more, keeping as much length through the left side of your body as possible. Your body should form a straight line from your fingers to the heel of your back foot.
Alignment
- Align your front knee over the center of your foot. Press your back heel down, firmly into the ground. Engage your core and keep your torso facing to the side.
- Create a long, extended line from your heel to your left fingertips. If possible, turn your gaze to your top hand.
How to Make Extended Side Angle Pose Easier
- If you can’t reach the floor with your hand, use the variation of the forearm on the thigh or a block outside the ankle to help support your hand.
- To reduce the stress on your hips, step your back foot closer to your front foot .
- If your neck is tight, look down at the ground or to the side instead of up at your top hand.
- If reaching up and forward proves too difficult, just reach for the ceiling.
How to Intensify Extended Side Angle Pose
- To deepen the pose, continue to engage your abs and spin your torso open to the side, instead of the collapsing the chest toward the floor.
- Reach your top hand forward so your arm is closer to your head. This will create a longer line from your heel to hand, and create more of a stretch on the side of your body.
Benefits of Extended Side Angle Pose
- Stretches your ankles, legs, groin, back, and sides of your torso.
- Helps to open your chest as you twist to reach your arms wide.
- In addition to stretching, it also strengthens your leg muscles and your core as you fight for stability and balance in the pose.